 Original
 HDR effect with Photomatix
For this short tutorial I will use Photomatix but you can use whatever software you like. The RAW file used will be available and I think it would be great if more readers shared their results here. To do that just leave a comment with the final image and a comment explaining how you did it.
Step01
I'm not an expert and I'm always searching for the best ways to improve my photo and HDR skills.
1 way to do it is by Auto-Exposure Bracketing (AEB). If your camera offers AEB, select the Continuous Shooting mode, make sure the camera is set to Aperture Priority, and select an exposure increment of +/-2. The camera will automatically vary the shutter speed each time the shutter button is pressed, taking several exposures spaced by two f-stops.
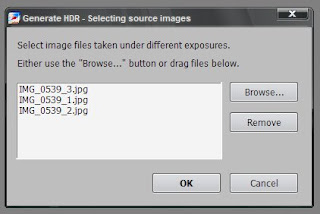
Now in Photomatix, go to Process>Generate HDR. Select the 3 images and press OK.
Step03
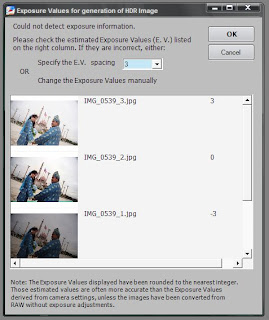
Change the Specify E.V spacing to 3 and press OK. Another dialog box will open, just press OK again. It asks you if you want Photomatix to align the images and other options, but as we are working with 3 different files from the same image that wont be a problem.
 Step 4
Here is where the magic works, the Tone Mapping. Actually this is the part where you adjust the settings to create the HDR. To be honest, there's no fixed adjustment for a particular kind of picture. It all depends on how well is the lighting or how u want the HDR effect to be and etc etc.
It takes some 'trail and error' to get that particular kind of HDR fx that u want, but here's my setting for this picture anyway.
Conclusion
Step01
I'm not an expert and I'm always searching for the best ways to improve my photo and HDR skills.
1 way to do it is by Auto-Exposure Bracketing (AEB). If your camera offers AEB, select the Continuous Shooting mode, make sure the camera is set to Aperture Priority, and select an exposure increment of +/-2. The camera will automatically vary the shutter speed each time the shutter button is pressed, taking several exposures spaced by two f-stops.
You may have to change the exposures manually if your camera does not bracket in steps greater than 1, or if it can only take 3 auto-bracketed frames when the dynamic range of the scene requires 5 or more.
Anyway, As I had only one RAW file, I created 3 different images with different exposures: -3, 0,+3. You can do that in Photoshop, or any other tool. Save all the images in JPEG.
Step02Now in Photomatix, go to Process>Generate HDR. Select the 3 images and press OK.

Step03
Change the Specify E.V spacing to 3 and press OK. Another dialog box will open, just press OK again. It asks you if you want Photomatix to align the images and other options, but as we are working with 3 different files from the same image that wont be a problem.
 Step 4
Here is where the magic works, the Tone Mapping. Actually this is the part where you adjust the settings to create the HDR. To be honest, there's no fixed adjustment for a particular kind of picture. It all depends on how well is the lighting or how u want the HDR effect to be and etc etc.


